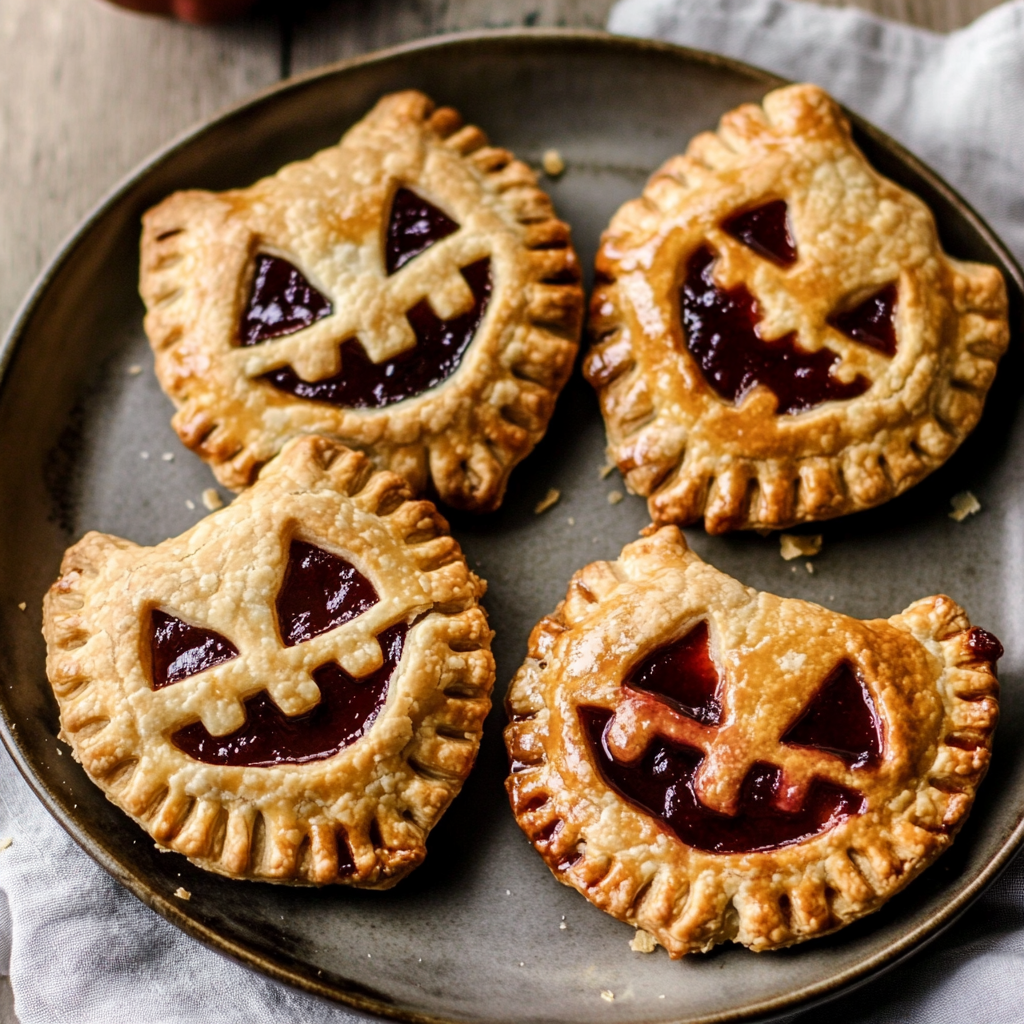
These adorable Jack-O-Lantern Hand Pies are the perfect sweet treat to celebrate Halloween! They bring a delightful twist to your dessert table, combining the warmth of baked apples and fresh blackberries into a cute, festive shape. Whether you’re hosting a party or simply want to enjoy a seasonal snack with your family, these hand pies will surely put smiles on everyone’s faces.
What I love most about Jack-O-Lantern Hand Pies is how they not only taste delicious but also capture the spirit of Halloween. The fun pumpkin shapes and playful faces make them an instant hit with both kids and adults alike. Plus, they’re easy to make and can be prepared ahead of time, making them a stress-free addition to any celebration!
Why You’ll Love This Recipe
– Simple preparation: With easy-to-follow steps, you’ll have these hand pies ready in no time.
– Festive fun: Their playful jack-o-lantern design adds a delightful touch to any Halloween gathering.
– Delicious fillings: The combination of spiced apples and roasted blackberries creates a mouthwatering flavor experience.
– Perfect for sharing: These handheld treats are great for parties, picnics, or cozy nights at home with loved ones.
– Customizable: You can easily adapt the fillings to suit your taste preferences or what you have on hand!
Ingredients You’ll Need
Before we dive into the baking process, let’s gather our ingredients! You’ll need some basic pantry staples along with fresh fruits that will make these hand pies truly special.
For the Crust
– 2 1/2 cups all-purpose flour
– 1 tablespoon granulated sugar
– 1 teaspoon kosher salt
– 2 sticks (8oz unsalted butter, diced and very cold)
– 6-9 tablespoons ice water
For the Fillings
Apple Filling
– 2 large honey crisp apples (peeled and diced small)
– 3 tablespoons salted butter
– 2 tablespoons bourbon barley tea
– 1 teaspoon vanilla bean paste
– 1/2 teaspoon ground cinnamon
– 2/3 cup brown sugar
Blackberry Filling
– 18 oz fresh blackberries
– 1/3 cup granulated sugar
– 1 teaspoon vanilla extract
For Assembly
– 1 egg (for egg wash)
– 1/4 cup raw or turbinado sugar (for sprinkling)
Variations
Feel free to get creative with your Jack-O-Lantern Hand Pies! Here are some ideas to mix things up:
– Swap the filling: Use pears or peaches instead of apples for a different fruity flavor.
– Change the spices: Experiment with different spices like nutmeg or ginger for added warmth.
– Try a chocolate surprise: Add mini chocolate chips to either filling for a decadent twist.
– Make it savory: Replace the fruit fillings with spiced pumpkin puree or mashed sweet potatoes for a unique savory version.
How to Make Jack-O-Lantern Hand Pies
Step 1: Prepare the Crust
To make the crust, start by mixing together the flour, sugar, and salt in the bowl of a stand mixer fitted with the paddle attachment. This step is crucial because it helps evenly distribute dry ingredients before adding fat. Mix on low speed for about 15 seconds. Next, add the cold diced butter all at once and beat on low until the mixture resembles coarse sand with pea-sized pieces of butter. This will create flaky layers in your crust. While mixing on low, gradually add about 6 tablespoons of ice water. Continue mixing until you see clumps form around the paddle or sides of the bowl. If it feels too dry, add more ice water one teaspoon at a time.
Step 2: Chill the Dough
Once your dough comes together, tip it out onto a lightly floured surface using a spatula. Quickly knead it into a rough ball—this process helps develop some gluten without overworking it. Divide the dough in half and shape each half into balls; wrap them tightly in plastic wrap and flatten each one into discs. Refrigerate for at least an hour (or overnight) so they become firm and easier to roll out later.
Step 3: Prepare the Apple Filling
In this step, we’ll create that delicious apple filling! Heat three tablespoons of salted butter in a stainless steel sauté pan until just golden brown—this adds depth of flavor. Add your diced honey crisp apples and cook them for about two minutes; this softens them slightly while still retaining their natural crunch. Afterward, add bourbon barley tea (a wonderful non-alcoholic option), vanilla bean paste, cinnamon, and brown sugar. Toss everything together and let it cook down for an additional five to seven minutes until you have a syrupy consistency that enhances those apple flavors beautifully. Allow this mixture to cool to room temperature before using.
Step 4: Prepare Blackberry Filling
Next up is our vibrant blackberry filling! Preheat your oven to 400 degrees F—and don’t forget about that parchment paper! Place fresh blackberries on your lined baking sheet and roast them for about thirty minutes; this intensifies their flavor wonderfully. After roasting, transfer them to a stainless steel pot along with granulated sugar and vanilla extract. Simmer over medium heat for ten minutes until thickened; once done, allow this mixture to cool as well.
Step 5: Roll out the Dough
Now it’s time for some fun! Remove your chilled pie dough from refrigeration and lightly dust your work surface with flour. Roll out each disc until it’s about an eighth-inch thick; this thinness is key for achieving that delightful flakiness when baked. Using a four-inch pumpkin cookie cutter (or any similar shape), cut as many pieces as possible from each rolled-out section. Place these pumpkin cutouts on another parchment-lined baking sheet and refrigerate them again for twenty minutes—this helps maintain their shape during baking.
Step 6: Assemble Your Hand Pies
Preheat your oven again—this time to375 degrees F—and line another baking sheet with parchment paper while you prepare for assembly! Beat an egg in a small bowl; this will serve as our egg wash which helps seal everything together beautifully while giving that golden finish when baked. Start by placing pumpkin cutouts without faces onto your prepared tray; then spoon one-and-a-half tablespoons of either apple or blackberry filling right in their centers.
Brush around those edges with egg wash before placing another pumpkin cutout featuring its face on top—aligning edges carefully ensures none of that delicious filling escapes! Using a fork pressed firmly along edges seals everything tightly while creating pretty patterns too! Brush tops lightly again with egg wash before sprinkling raw or turbinado sugar if desired—it adds an appealing crunch!
Finally, bake those adorable hand pies for about twenty-five minutes until they turn dark golden brown—your kitchen will smell heavenly! Once done baking let cool slightly on racks before enjoying!
These Jack-O-Lantern Hand Pies are sure to bewitch everyone at your Halloween festivities! Happy baking!
Pro Tips for Making Jack-O-Lantern Hand Pies
Making these delightful Jack-O-Lantern Hand Pies can be a fun and rewarding experience! Here are some tips to ensure your hand pies turn out delicious and adorable.
– Use cold ingredients: Keeping your butter and water ice-cold will help create a flaky crust. Make sure to chill the butter before cutting and use ice water when mixing the dough.
– Roll the dough evenly: When rolling out the dough, aim for an even thickness of about 1/8 inch. This ensures that all your hand pies bake uniformly and have the same texture.
– Don’t overfill: It might be tempting to add more filling, but too much can cause the pies to burst during baking. Stick to the recommended amount for perfectly sealed pockets of goodness.
– Chill before baking: After assembling your hand pies, refrigerating them for about 20 minutes helps maintain their shape while baking. It also contributes to a flakier crust.
– Experiment with fillings: While apple and blackberry are delicious, feel free to try other fruit combinations or sweet fillings that you love to make it your own!
How to Serve Jack-O-Lantern Hand Pies
These charming hand pies not only taste amazing but also look festive on any table! Here are some ideas for how to present them.
Garnishes
– Whipped cream: A dollop of freshly whipped cream adds a light touch and pairs beautifully with the fruity filling.
– Cinnamon sugar dusting: Sprinkle a little cinnamon sugar on top after cooling for an extra hint of flavor.
Side Dishes
– Vanilla ice cream: Serve alongside a scoop of vanilla ice cream for a delightful contrast in temperature and texture.
– Fresh fruit salad: A refreshing fruit salad can complement the sweetness of the hand pies.
– Hot apple cider: This warming drink is perfect for fall gatherings and pairs wonderfully with the flavors in your hand pies.

Make Ahead and Storage
Planning ahead can make your Halloween festivities smoother! Here’s how you can store or prepare these delicious treats in advance.
Storing Leftovers
– Allow the hand pies to cool completely before storing them in an airtight container at room temperature.
– They will stay fresh for up to 2 days, but if you’re not consuming them right away, consider freezing them instead.
Freezing
– To freeze unbaked hand pies, assemble them but do not bake. Place them on a parchment-lined baking sheet in the freezer until solid, then transfer them to a freezer-safe bag or container.
– You can freeze baked hand pies as well; just allow them to cool completely before packaging them in airtight containers. They will keep well for up to 3 months.
Reheating
– For frozen unbaked hand pies, bake straight from the freezer at 375 degrees F for an additional 5–10 minutes.
– If reheating baked hand pies, place them on a baking sheet in a preheated oven at 350 degrees F for about 10–15 minutes until warmed through.
FAQs
If you have questions about making these Jack-O-Lantern Hand Pies, you’re not alone! Here are some common inquiries that may help you out.
Can I use different fruits for filling?
Absolutely! Feel free to experiment with other fruits like pears, peaches, or even mixed berries. Just remember to adjust sugar levels based on sweetness.
Can I make this recipe vegan?
Yes! You can substitute the butter with non-dairy alternatives like coconut oil or vegan butter. Use plant-based milk mixed with vinegar instead of egg wash for sealing and brushing purposes.
How do I create more intricate designs?
You can use cookie cutters or small knives to carve out more detailed jack-o-lantern faces on your pie tops. Just be careful not to cut too deeply!
Final Thoughts
I hope you enjoy making these delightful Jack-O-Lantern Hand Pies as much as I do! They’re perfect for sharing at your Halloween gathering or enjoying as a cozy treat at home. So roll up those sleeves, get creative with those fillings, and most importantly—have fun! Happy baking!
Jack-O-Lantern Hand Pies
Ingredients
Method
- Prepare the crust by mixing flour, sugar, and salt in a stand mixer. Add cold diced butter and mix until resembling coarse sand. Gradually add ice water until clumps form.
- Chill the dough by dividing it into two balls, wrapping in plastic, and refrigerating for at least an hour.
- Prepare the apple filling by cooking diced apples with butter, bourbon barley tea, vanilla bean paste, cinnamon, and brown sugar until syrupy. Cool to room temperature.
- Prepare the blackberry filling by roasting blackberries, then simmering with sugar and vanilla extract until thickened. Cool the mixture.
- Roll out the chilled dough to 1/8 inch thick and cut into pumpkin shapes. Refrigerate cutouts for 20 minutes.
- Assemble the hand pies by placing filling on one pumpkin cutout, sealing with another cutout, and brushing with egg wash. Sprinkle with sugar and bake until golden brown.

Leave a Comment